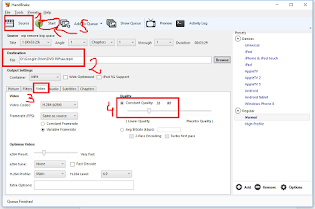
Install handbrake then follow the image instructions :
1. Select Source and put you video in or just drag the video over handbrake window. 2. Select Destination and type and name for the video. 3. Select the Video tab and drag Quality to the left up to 25 or even lower dont go lower then 30 as it gets bad, but you can test and see what you like. 4. Pres Start.
Resolutions compatible with full hd or 1920 x 1080
At under 100 ppi image gets pixalated from close up 20-30cm For a PPI ~100 4k 3840x MAX 42 inch QHD - MAX 27 inch FHD MAX 22 inch
Run Davinci on Linux
Once you install DaVinci you get a message that no suported video cards are detected and something about no media storage. You need to install video and opencl drivers.
Debian has the largest package library of software. It uses a package format .deb that are installed by the dpkg app. In order to manage dependencies and download automatically there is apt (Advanced Packaging Tool).
Synaptic is a graphical package management tool based on GTK+ for apt. Apt commands in the console.
apt install
apt-get install
Installs a package
apt remove
apt-get remove
Removes a package binaries
apt purge
apt-get purge
Removes package with configuration and user data
apt autoremove
apt-get autoremove
Removes unused dependencies
apt upgrade
apt-get upgrade
Upgrades all upgradable packages
apt update
apt-get update
Refreshes repository index / package list
apt full-upgrade
apt-get dist-upgrade
Upgrades packages with auto-handling of dependencies
apt search
apt-cache search
Searches for the program
apt show
apt-cache show
Shows package details
apt list
Lists packages with criteria (installed, upgradable etc)
apt edit-sources
Edits sources list
You can use synaptic as a GUI for apt.
apt autoremove packagename --purge - remove binaries, config, user data and dependencies - complete uninstall
apt list --installed | grep packagename - check if you have some package installed
Note: - purge only removes system wide configuration from the /etc folder. It does not remove user profiles that are stored in the home folder .config and .cache folders
To remove 32 bit architecture packages and remove source repositories
Pin 3 - input led - connect to a digital pin on arduino. Note according to datasheet the input (drive) led is actually the base of a transistor connected to GND and not the actual led. So when we set the digital pin to HIGH we connect the led to GND and stop it. To turn the led on we have to set the digital pin to LOW. Pin 5 - output- connect to analog pin on arduino A0-A5
// one read digitalWrite(ledPin, LOW); // power on the LED delayMicroseconds(280); // Wait 0.28ms according to datasheet output_voltage = analogRead(3); // read output delayMicroseconds(40); // wait 0.040 ms according to datasheet digitalWrite(ledPin, HIGH); // turn the LED off output_voltage = (3.33 / 4096) * output_voltage; // max 3.6v delayMicroseconds(9760);
Note: i used a chinese clone from wavgate and althout it says it has an atmega 328p chip - the analog line read 4064 when connected to the 3.3v line - so that means a 12bit ads with 3.33v internal reference. If you have the normal 5v 10bit 1024 resolution ads - change above to 3.33/4096 to 5/1204 .
If you are not sure what ads bits you have, connect the 3.3 and 5 lines to A0 for example and read with analogRead and see what result you get.
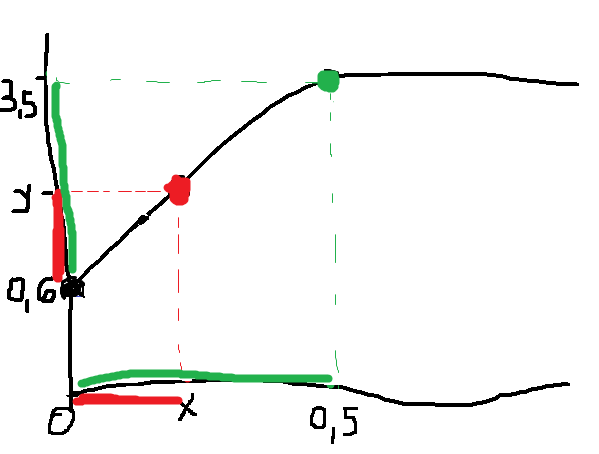
Next we have to convert the voltage to dust density according to the graph offered in the datasheet.
We have from the graph and datasheet info: Output voltage at no dust 0.6v - 0 mg/m3 dust - given in the datasheet And the graph intersect at 3.5v - 0.5 mg/m3 dust - you can see it on the graph clearly With two points we can make a formula.
y-0.6 = x-0 3.5-0.6 = 0.5-0
y-0.6 3.5-0.6 ------- = ---------- x-0 0.5-0
x = 0.5(y-0.6) / (3.5-0.6) x = (y-0.6)*0.5/2.9 = (y-0.6)*0.17 = 0.17*y - 0.6*0.17 = 0.17y-0.1
Note: the sensor it is not very exact, as in the datasheet it says voltage at no dust is typical 0.6V but can go from 0.1V to 1.1V
There you go. Because the sensor output fluctuates a lot and it is not stable, i like to make an average of around 100 reads (129 in the code below) or about one second - one read takes 10ms - so the output its a bit more stable. Next is full code that shows result on and a lcd screen or on the serial console.
// 100 samples medie - 1 reading per second // one read
digitalWrite(ledPin, LOW); // power on the LED delayMicroseconds(280); // Wait 0.28ms according to DS output_voltage = analogRead(dustPin); delayMicroseconds(40); digitalWrite(ledPin, HIGH); // turn the LED off output_voltage = (3.33 / 4096) * output_voltage; // max 3.6v delayMicroseconds(9760);
On an ECG - electrocardiogram - you get the letters P Q R S T. The time between two R, noted as R-R is HRV.
Initially researched by HearthMath institute it has been now accepted and implmented by many.
During relaxation the parasympathetic nervous system dominates, heart bpm drops and HRV increases During stress the sympathetic nervous system dominates, heart bpm increases and HRV decreases
If you are chronically stressed or injured etc the body will stay in a sympathetic mode to sustain recovery even while resting. This is consuming for the body and you should not do any stressful activities like training, tough decisions etc. that like overcome the body's ability to compensate and it will trow you out of balance and in a bad state of health. Hence the need to read your morning HRV so you know how your body is doing and how you continue your day.
Sensors:
- HearthMath Inner Balance sensor: many reviews on amazon say the sensor's quality is not reflected by its price which is around 160$ + shipping - Polar H7/H9 or H10 - H10 being the best for accuracy - most easy to find and buy locally ~ 100$ - CorSense from the maker of the app https://elitehrv.com/ - 165$ - but expensive outside of the US ( around 200$ in europe with added vat) - the most convenient one to use
Polar H7 and H9 vs Poalr H10
You can see in the above image, the H10 has the same metal rounded electrode that is crimped to the connector, but also another rectangular metal band behind it that acts as a shield connected to ground to prevent exterior interference.
Note: i bought an spare chest strap from aliexpress that it is rated as a replacement for the H10 but it only has the main electrode and no shielding - so it is an equivalent to the H7/H9 soft strap.
“The extra interference-preventing electrodes on the strap make it extremely sensitive to your heart’s electrical signals, providing maximum precision for heart rate readings and eliminating interference.”
Best accuracy sensor: ( note that it works under 70% humidity depending on what weather conditions you have where you life) The Nova SDS011 - also recommenced by the https://luftdaten.info/ project
-connect pin TXD on SDS011 to pin 2 in section (Digital PWM) on arduino (it will act as RX on arduino)
-connect pin RXD on SDS011 to pin 3 in section (Digital PWM) on arduino (it will act as TX on arduino)
-5v and gnd - same
Arduino Code: - it will print both to a i2c lcd display and serial console
#include "LiquidCrystal_I2C.h"
#include "SoftwareSerial.h"
SoftwareSerial mySerial(2, 3);
// Global Variables
static unsigned char buf[7], buffSDS[25];
unsigned int PM2_5,PM10=0;
LiquidCrystal_I2C lcd(0x27,20,4);
void setup() {
// put your setup code here, to run once:
lcd.init(); // initialize the lcd
lcd.backlight();
lcd.clear();
// Read SDS011 on Serial
mySerial.begin(9600); //
mySerial.setTimeout(200);
//mySerial.readBytesUntil(0xAB,buffSDS,20); // read serial until 0xAB Char received
// Serial Monitor
Serial.begin(115200);
}
void loop() {
// put your main code here, to run repeatedly:
// Read SDS011
mySerial.readBytesUntil(0xAB,buffSDS,20);
// Serial monitor, print the HEX bytes received in buffSDS
//Serial.write(buffSDS,10);
for ( int8_t i=0; i<10 ; i=i+1 )
{
Serial.print( buffSDS[i],HEX);
Serial.print(" ");
}
Serial.println("");
PM2_5 = ((buffSDS[3]*256)+buffSDS[2])/10; // extract PM2.5 value
Serial.print("PM2.5: ");
Serial.println(PM2_5);
lcd.setCursor(0,0);
lcd.print("PM2.5: ");
lcd.print(PM2_5);
PM10 = ((buffSDS[5]*256)+buffSDS[4])/10; // extract PM10 value
Serial.print("PM10: ");
Serial.println(PM10);
lcd.print((char)228);
lcd.print("g/m3");
lcd.setCursor(0,1);
lcd.print("PM10: ");
lcd.print(PM10);
lcd.print((char)228);
lcd.print("g/m3");
delay(500);
}
The sensor has 8000 hours of usage and outputs data every second. In order to use it for longer time you have to use the sleep and wake up vis serial.
Use this library : https://github.com/ricki-z/SDS011 It also has support for hardware serial connection for the esp32 which does not have software serial.
Connect RST pin to GND on Arduino Uno - to bypass the UNO's bootloader
Connect 5V or 3.3V to VCC on Mini
Connect GND to GND on Mini
Connect TX to TX
Connect RX to RX
Select in the Arduino IDE -> Tools -> Board -> Arduino Pro or Pro Mini
Select in the Arduino IDE -> Tools -> Board -> Processor -> 3.3V 8Mhz or 5V 16Mhz
Select in the Arduino IDE -> Tools -> Port
Select File->Examples ->Basics->Blink and press Upload button
When uploading appears in the Arduino IDE press the RESET button on the mini.
When you press the RESET button you should see the rx,tx lights on the uno start to blink fast for a short time - the sketch it is being uploaded.
The led on the Mini Pro should start blinking at one second.
DONE. ENJOY.
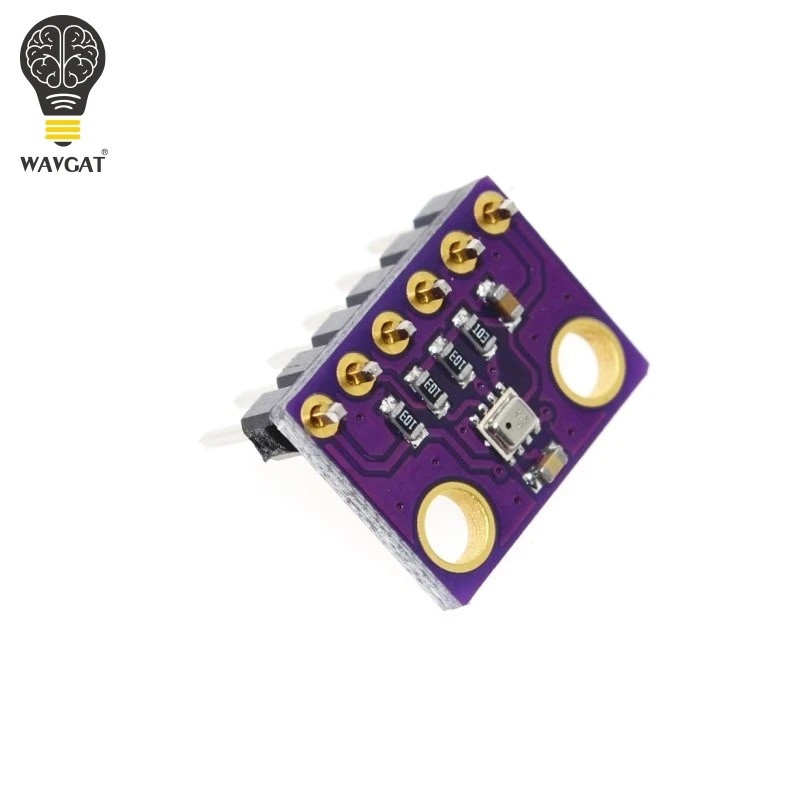
Arduino Libraries Required:
Adafruit_Sensor.h
Adafruit_BME280.h Go to Tools -> Manage Libraries : search for bme280 and select the adafruit one, and install all.
Wire connections:
- 5V and GND to coresponding
- the marked ones SDA, SCL on the end of the digital pins
- or the analog pins A4 (SDA) A5 (SCL)
Wire connections:
- 5V and GND to corresponding
- the marked ones SDA, SCL on the end of the digital pins
- or the analog pins A4 (SDA) A5 (SCL)
Arduino Code:
#include <LiquidCrystal_I2C.h>
LiquidCrystal_I2C lcd(0x27,20,4); // set the LCD address to 0x27
void setup()
{
lcd.init(); // initialize the lcd
lcd.backlight();
lcd.clear();
lcd.setCursor (0,3); // first parameter its the line 0,1,2,3 - second character position 0-20
lcd.print("Hello World");
}
void loop() {
}
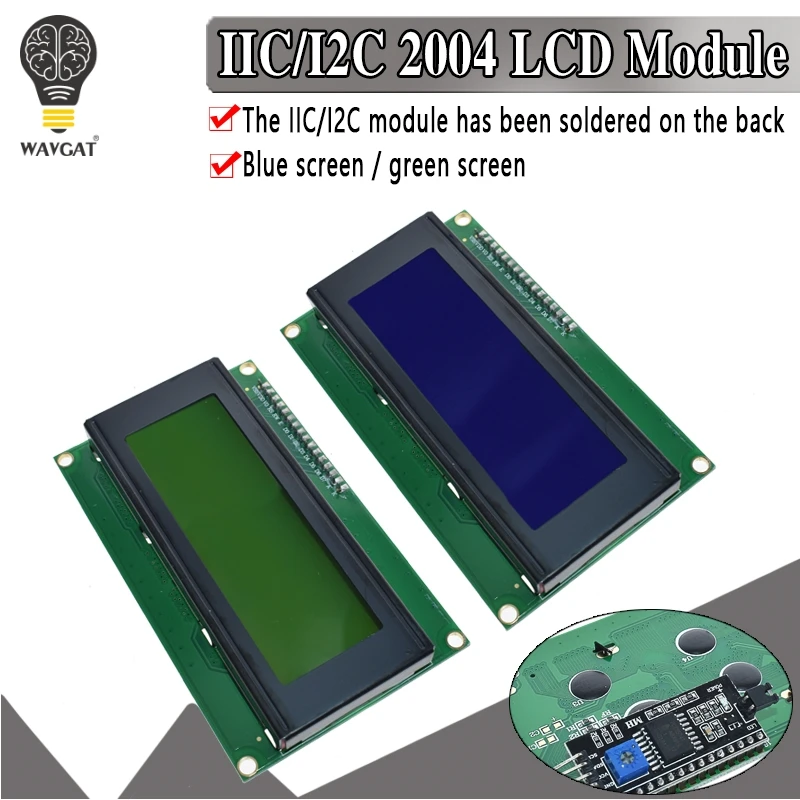
If you have more devices on the I2C buss you can change the address by soldering the A0, A1 OR A2 connection on the PCF8574T board.
To display a special character : lcd.print((char)228);
Contract and Backlight
- In case you don't see nothing on the screen, use a screwdriver and adjust the blue potentiometer on the back.
- The backlight on/off is controlled by the jumper
- jumper in place: backlight on
- jumper removed: backlight off
The backlight can also be controlled with software.
Use lcd.backlight(); to turn it on and lcd.noBacklight(); to turn it off.
WizzAir: https://wizzair.com CumparaWIZZ Discount Club la un zbor iesi pe zero, la doua deja ai reducere Daca ai intarziere verifica zborul aici: Status zboruri WizzAir
SEATGURU - vezi schita avionului cu locurile inainte sa-ti faci booking online si sa-ti alegi locul. For ex. check this Boeing 737 from KLM : KLM_Boeing_737-800
Cabin Max Metz Backpack Alege un rucsac care se deschide ca un bagaj pe laterala. NU mai stai sa-ti recuperezi bagajul si salvezi mult timp, in special daca ai legaturi unde poti pierde urmatorul zbor.
Cabin Max Metz 44L
By bus :
Flixbus – check their Route Map – its super cool for finding connections between cities
Let me give you my itinerary i did : I left Paris at 22 and arrived in Munich at 10 – visited Munich until 18 and took a bus to Prague where I arrived at 23 and when to a hostel – as Prague its 2-3 times cheaper compared to Munich). I stayed two nights in Prague then did another drive through Vienna and went to Budapest where again I stayed a few nights ( even cheaper rent for a hostel bed ).
By train :
Check InterRail – package train travel around Europe
Verifica costul transportului de la aeroporturile mici pana in oras. Zborurile lowcost aterizeaza departe de oras si costul/disntanta pot sa nu merite. http://www.terravision.eu - low cost airport trasfers
Check Uber prices as well, especially if you have a night flight in some places its cheaper then taxi in others is more expensive.
I got in Paris a shared Uber for 6.5 euro and public transport would have costed me 4 euros but it was more hassle and I was tired so the Uber was well worth the extra 2.5 euros.
Taxi: foloseste o aplicatie sau comanda din aeroport. Intreaba pretul altfel.
Tip: ask for a free metro/transport network at your hotel/hostel, don't spend 10 euro on one.
If you are an amazon affiliate and are about to receive your first check you might be worried about how safe can you receive it.
The easiest fix for this is using Payoneer, it's an payment system similar to Paypal, and it opens an us dollars account for you.
You also get the benefit of payments as small as 10$ from amazon.
1. First step open for free a Payoneer account. Use this link to register so you also get 25$ bonus after your receive payments.
Log in to your account and go to Receive - Global Payment Service. Make sure USD is selected from the left as in the image below.
2.1. Go to your amazon affiliate account and log in.
Go to Account Settings - Change Payment Method. See the image below.
2.2. Chose Pay me by direct deposit (United States Based Associates Only)
Fill in the data from the page on Payoneer opened earlier. See picture above.
3. Get at least 50$ in payments from Amazon then go and withdraw your earning to your local non-US bank account.
Bitcoin: Is a cash system where the ledger with transactions is hold by a Peer-to-Peer public network, where anybody can check transactions.
In order to validate transactions miners have to do some work - solve some mathematical problems, and hence use some power and resources. The more people participating the more difficult the mathematical problems and the higher the security, as it requires huge amounts of processing power.
It becomes unprofitable for one individual to spend that much money on the hardware and power need it to run it vs the value gained.
Miners assemble all new transactions appearing into large bundles called blocks, which collectively constitute an authoritative record of all transactions ever made, the blockchain.
In order to make sure there is only one blockchain blocks are really hard to produce.
So instead of just being able to make blocks at will, miners have to produce a cryptographic hash of the block that meets certain criteria, and the only way to find one is to try computing many of them until you get lucky and find one that works. This process is referred to as hashing. The miner that successfully creates a block is rewarded with some freshly created bitcoins.
Every few days, the difficulty of the criteria for the hash is adjusted based on how frequently blocks are appearing, so more competition between miners equals more work needed to find a block. This network difficulty, so called because it is the same for all miners, can be quantified by a number.
Mining pools: by sharing their processing power, miners can find blocks much faster. Pool users earn shares by submitting valid proofs of work, and are then rewarded according to the amount of work they contributed to solving a block.
A documentary released in 2014 The Rise and Rise of Bitcoin
How is the bitcoin fee calculated ?
The value of the fee its not related to value of transferred bitcoins but by the size of the transaction in bytes.
This is calculated by the number of in transaction for the wallet multiplied by something like 180 plus the number of out transactions for the wallet multiplied by something like 34. So getting bitcoins paid adds more to the fee then paying with bitcoins.
Then the bytes values of the transaction get multiplied by a value called satoshisthat its network dependent : how many transactions are happening and what fees people use.
Most apps have some default values where they will use a value so that you transaction will get into the next n-th block based on some settings you input or uses some default values.
You can check satoshisvalue here : https://bitcoinfees.21.co/
How much profit can you make mining ?
(Your power / network hash power)* Coins generated per day * Coin price
Say you have 1 THash miner 1.03.2018 for Bitcoin:
(1/23.500.000)*1800*11.000 $ =~ 0.85$ / day
Minimum bitcoin transation is : 5460 satoshi or 0,05460 mBTC.
This is the same amount as the minimum fee recommended.
1 BTC = 1,000,000,00 satoshi
Why is there a minimum limit of transaction in bitcoin ?
This limit is not forced by the protocol but by a consensus between both bitcoin clients as well as miners in an effort to fight transaction spam
Altcoins
Altcoins are the alternative cryptocurrencies launched after the success of Bitcoin, as peer-to-peer digital currencies, that offer modifications in areas like transaction speed, privacy, proof-of-stake, DNS resolution and more, in an attempt to imitate that success.
How to solo mine bitcoin with vga
Get BFGminer 4.10.6 ( this one works for sure, i'm not sure exactly in what version they removed some option).
Download link here: http://bfgminer.org/files/4.10.6/
Get bitcoin core install and wait to download the blockchain - requires ~190GB of storage space [on 14.07.2018].
When you install the core chose to save the blockchain in other location then by default on C, for easier access. Put it in D:\Bitcoin if you have another partition or in C:\Bitcoin.
There you will have your configuration file: bitcoin.conf.
Note that depending on you internet connection it might take couple of days to fully download and sync to the network.
You cannot mine until the sync is completed.
Download link here: https://bitcoin.org/en/download
Now go and edit the bitcoin.conf file. If it does not exist just create one with notepad.
Replace the username and password with the ones you set in bitcoin core.
Go to https://www.blockchain.com/wallet and create a bitcoin wallet.
Replace the --conbase-addr with your new created wallet.
To get the address press the receive bitcoins button and you will get your address.
Run the file and I wish you good luck.
If you are lucky and win the bitcoin lottery don't forget to show your appreciation :)
My bitcoin address is: 18Mzayw6yHve2zn1ZQkxKYnM9TcvfEF7Y2