Saturday, November 30, 2019

Air quality PM sensors comparison for arduino

Best accuracy sensor:
( note that it works under 70% humidity depending on what weather conditions you have where you life)


The Nova SDS011 - also recommenced by the https://luftdaten.info/ project


Price: 17$
Official website: http://www.inovafitness.com/en/a/chanpinzhongxin/95.html
Buy from aliexpress: http://s.click.aliexpress.com/e/Nz5SXZBE

Connections for code:
-connect pin TXD on SDS011 to pin 2 in section (Digital PWM) on arduino (it will act as RX on arduino)
-connect pin RXD on SDS011 to pin 3 in section (Digital PWM) on arduino (it will act as TX on arduino)
-5v and gnd - same

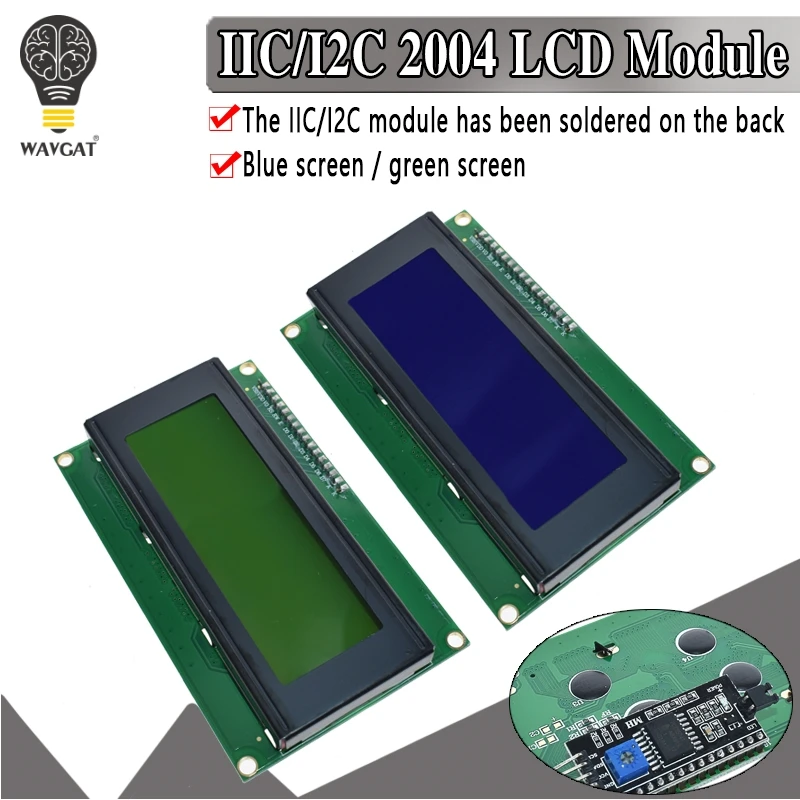
Arduino Code: - it will print both to a i2c lcd display and serial console

#include "LiquidCrystal_I2C.h"
#include "SoftwareSerial.h"
SoftwareSerial mySerial(2, 3); 

// Global Variables
static unsigned char buf[7], buffSDS[25];
unsigned int PM2_5,PM10=0;

LiquidCrystal_I2C lcd(0x27,20,4); 

void setup() {
  // put your setup code here, to run once:
  lcd.init();                      // initialize the lcd 
  lcd.backlight();
  lcd.clear();

  
  // Read SDS011 on Serial 
  mySerial.begin(9600);  // 
  mySerial.setTimeout(200);
  //mySerial.readBytesUntil(0xAB,buffSDS,20); // read serial until 0xAB Char received

  // Serial Monitor
  Serial.begin(115200);  


}

void loop() {
  // put your main code here, to run repeatedly:
  // Read SDS011
  mySerial.readBytesUntil(0xAB,buffSDS,20);

  // Serial monitor, print the HEX bytes received in buffSDS
//Serial.write(buffSDS,10);

for ( int8_t i=0; i<10 ; i=i+1 )
  {
  Serial.print( buffSDS[i],HEX);
  Serial.print(" ");

  }
Serial.println("");

  
PM2_5 = ((buffSDS[3]*256)+buffSDS[2])/10; // extract PM2.5 value
Serial.print("PM2.5: ");
Serial.println(PM2_5);

lcd.setCursor(0,0);
lcd.print("PM2.5: ");
lcd.print(PM2_5);


PM10 = ((buffSDS[5]*256)+buffSDS[4])/10; // extract PM10 value
Serial.print("PM10: ");
Serial.println(PM10);
lcd.print((char)228);
lcd.print("g/m3");

lcd.setCursor(0,1);
lcd.print("PM10: ");
lcd.print(PM10);
lcd.print((char)228);
lcd.print("g/m3");


delay(500);
}

The sensor has 8000 hours of usage and outputs data every second. In order to use it for longer time you have to use the sleep and wake up vis serial.

Use this library : https://github.com/ricki-z/SDS011
It also has support for hardware serial connection for the esp32 which does not have software serial.

Check example in the library.


Plantower
Official website: http://www.plantower.com/en/content/?108.html

https://airly.eu/en/ - a project by Philips in witch they use the Plantower PMS5003
You can see the sensor and the insides of their sensor here:
https://www.youtube.com/watch?v=FREADCgdq2M

Plantower PMS5003

Buy the Plantower PMS5003 from aliexpress: http://s.click.aliexpress.com/e/tb2qOLXK
Price: 12-13$


Popular Pm monitors on the market and what sensors they use:

Laser Egg - uses Plantower PMS3003


AirVisual Node : proprietary PM sensorSenseAir S8 - for CO2


Additional resources:

http://aqicn.org/sensor/

https://www.mysensors.org/build/dust

Wednesday, November 20, 2019

Program Arduino Mini Pro 3.3/5V with Arduino Uno


Connect RST pin to GND on Arduino Uno - to bypass the UNO's bootloader

Connect 5V or 3.3V to VCC on Mini
Connect GND to GND on Mini
Connect TX to TX
Connect RX to RX

Select in the Arduino IDE -> Tools -> Board -> Arduino Pro or Pro Mini
Select in the Arduino IDE -> Tools -> Board -> Processor -> 3.3V 8Mhz or 5V 16Mhz
Select in the Arduino IDE -> Tools -> Port

Select File->Examples ->Basics->Blink and press Upload button
When uploading appears in the Arduino IDE press the RESET button on the mini.
When you press the RESET button you should see the rx,tx lights on the uno start to blink fast for a short time - the sketch it is being uploaded.

The led on the Mini Pro should start blinking at one second.
DONE. ENJOY.

Tuesday, November 19, 2019

Bosch BME280 sensor with arduino for temp humidity and pressure


Buy sensor for here: http://s.click.aliexpress.com/e/KY9P6WRm


Arduino Libraries Required:
Adafruit_Sensor.h
Adafruit_BME280.h

Go to Tools -> Manage Libraries :
search for bme280 and select the adafruit one, and install all.

Wire connections:
- 5V and GND to coresponding
- the marked ones SDA, SCL on the end of the digital pins
- or the analog pins A4 (SDA) A5 (SCL)

Arduino Code:

#include <Adafruit_Sensor.h>
#include <Adafruit_BME280.h>
Adafruit_BME280 bme; // I2C
void setup()
{
    bool status;
    status = bme.begin();
}
void loop() {
float temp = bme.readTemperature();   // celsius
  float humidity = bme.readHumidity();  // read humidity
  float altitude = bme.readAltitude(1013.25);// read altitude  SEA LEVEL PRESSURE_HPA (1013.25)
  float pressure = bme.readPressure() / 100.0F; // read pressure
delay(5000);

}

Display 2004A generic 4 line 20 characters display with PCF8574T expander


4 line display with PCF8574T -  I/O expander for I2C-bus -  two-wire bidirectional (serial clock (SCL), serial data (SDA))

Arduino Library required: LiquidCrystal_I2C.h
Put the files in Documents -> Arduino -> libraries

Tip: also buy a case for the display, it stands up and its easy to read: http://s.click.aliexpress.com/e/lqzxEDeo

Wire connections:
- 5V and GND to corresponding
- the marked ones SDA, SCL on the end of the digital pins
- or the analog pins A4 (SDA) A5 (SCL)

Arduino Code:

#include <LiquidCrystal_I2C.h>
LiquidCrystal_I2C lcd(0x27,20,4);  // set the LCD address to 0x27
void setup()
{
  lcd.init();                      // initialize the lcd
  lcd.backlight();
  lcd.clear();
 lcd.setCursor (0,3);   // first parameter its the line 0,1,2,3 - second character position 0-20
 lcd.print("Hello World");
}
void loop() {
}
 If you have more devices on the I2C buss you can change the address by soldering the A0, A1 OR A2 connection on the PCF8574T  board.


To display a special character : lcd.print((char)228);

Contract and Backlight
- In case you don't see nothing on the screen, use a screwdriver and adjust the blue potentiometer on the back.
- The backlight on/off is controlled by the jumper
- jumper in place: backlight on
- jumper removed: backlight off

The backlight can also be controlled with software.
Use  lcd.backlight(); to turn it on and lcd.noBacklight(); to turn it off.