Monday, December 12, 2022

Linux autologin + Sudo with yubikey

Authentification is done by PAM - Pluggable Authentication Modules
Passwords are stored in /etc/shadow

passwordless login with yubikey on linux

HMAC-SHA1 Challenge-Response is specific for Yubikey only.

yubiko-pam - is yubikey-specific and relay on it's specific features, 
pam-u2f - is generic and works with any keys supporting u2f and/or fido2.

auth required pam_u2f.so cue interactive

 Set authentification with yubikey off-line with Challenge-Response so you dont have to type a password just touch the keyyubikey

install yubico pam package
# install chalenge to slot 1
# generate challenge file for slot 1
ykpamcfg -1 -v
man ykpamcfg

/etc/pam.d/common-auth
#[success=1 new_authtok_reqd=ok ignore=ignore default=die]
auth required   pam_echo.so "Touch the key"
auth  sufficient      pam_yubico.so mode=challenge-response authfile=/home/user/.yubico/challenge-xxxx

Install xscreensaver if you want to lock the screen

Autologin with desktop/login manager

autologin with lightdm:
/etc/lightdm/lightdm.conf -- uncomment the lines
autologin-user = sorin
autologin-user-timeout = 0
*Note if you cannot login with the user but you can with root check if you ran out of space. (df -h)

Autologin with systemd directly

Agetty is called by /bin/INIT and this calls /bin/login 

/etc/systemd/system/getty.target.wants/getty@tty1.service
add -a my_username

ExecStart=-/sbin/agetty -a username - $TERM
remove the login options -o '-p -- \\u'

To start X11 with xfce
~/.bash_profile
if [ -z "${DISPLAY}" ] && [ $(tty) = /dev/tty1 ]; then
  startxfce4
fi

Tuesday, November 8, 2022

Mouse latency response time in linux

 lsusb

Find your mouse. 

Bus 001 Device 003: ID 1a7c:0191 Evoluent VerticalMouse 4

sudo usbhid-dump -s 1:3 -f -e stream

From the manual we get what the parameters mean:
man usbhid-dump
 -s =bus[:dev]
Replace -s 1:3 with the Bus Device for your device

Output is in the form
BUS:DEVICE:INTERFACE:ENTITY TIMESTAMP

.001:003:000:STREAM             1667902900.482858
 00 00 00 FC FF 00 00

.001:003:000:STREAM             1667902900.490787
 00 00 00 FE FF 00 00

.001:003:000:STREAM             1667902900.498863
 00 01 00 FC FF 00 00

Timestamp is in seconds before the point and subdivisions of seconds after the point.
First 3 digits milliseconds next 3 digits microseconds.
So the difference between two events is in my case is 8ms.
Note the speed dpi choise does not affect this. This is the maximum physical transmit speed.

usbhid-dump will disconect you mouse/device.
if you mess up just remove the receiver and plug-it back in or wait 60 seconds.

It is a WiFi Evoluent Vertical Mouse 4.

Configure Mouse Buttons X11
xinput
press a button and run in terminal to find the number associated with each button
xinput query-state id-nr
or
xev | grep button


xinput set-button-map "Kingsis Peripherals Evoluent VerticalMouse 4" 1 2 3 4 5 6 7 9 2 8

90-evoluent.conf /usr/share/X11/xorg.conf.d/conf
Section "InputClass" Identifier "Evoluent VerticalMouse 4" MatchUSBID "abcd:0123" # input id: 1 2 3 4 5 6 7 8 9 10 Option "ButtonMapping" "1 2 3 4 5 6 7 9 2 8" EndSection


Tuesday, November 1, 2022

Nofap - block porn

 Change the dns on your router in the DHCP section, with the dns from cisco OpenDNS  FamilyShield

https://www.opendns.com/setupguide/#familyshield

208.67.222.123
208.67.220.123

Use cloudflare warp - set it to familly mode full (malweare + adult)
Chrome - uses and external google dns to bypass it.
chrome://net-internals/?#dns  --- you can check here what dns record it returns
To disable external google dns go to:
Settings - Privacy and security - Security : chrome://settings/security - 
at the bottom of the page Use secure dns - With your current service provider - and it will use warp/cloudflare settings.

Youtube - click the profile picture in right top corner - and select Restrcited Mode - On - but the downside is it disables the comment section.

Android - Settings - Google  - Settings for Google apps (last one) - Search, Assitant & Voice (last one) - Hide Explicit results - On

Sunday, October 23, 2022

Hacker movies

 Takedown 2000 - computer hacker Kevin Mitnick

Antitrust 2001

The net 1995

Hackers 1995


Disable notification pop-ups in chrome

 Click on vertical 3dots icon for menu list and choose the Settings option.

  1. Switch to the Privacy and Security section and click on the Site Settings tab.
  2. Scroll down to the Permissions section and click on Notifications.
  3. Select 
  4. Don't allow sites to send notifications
    Features that need notifications won't work

Tuesday, September 20, 2022

Drone project

Battery LiPo

The voltage in LiPo (Lithium Polymer) batteries is determined based on the number of cells they have and we can easily identify this by referring to the "S" count. Each LiPo cell is rated at 3.7v so a 2S LiPo means it's a 2 cell battery and 7.4v, a 3S is 11.1v, 4S is 14.8v and 6S is 22.2v.

Motor

 2306 2555KV

Firmware - https://ardupilot.org/

Tuesday, September 6, 2022

Hosting server types

Hosting types

Shared hosting – many websites share the same os with same general settings
You get allocated a maximum usage - but the resources are not guaranteed - if one account uses all his allocated resources the others suffer
- easy to get started with, comes with some web admin panel like cpanel so no administration knowledge required

VPS hosting (Virtual Private Server) – independent os - can be customised as you like.
You can get it either managed by the hosting or unmanaged - where you have to take care of everything.
Resource can be shared just like a shared hosting for prices around 10$ or dedicated from 25-30$.
On shared you get a minimum of like 0.5 virtual cpu and a maximum of 2vcpu for example - but  they will list the package as 2cpu.
Whenever you dont use all your 2vcpu other account hosted on the same physical machine will use them - which can get you to a place where you can ony use 0.5 vcpu because the rest are busy for the moment.

Dedicated server – you are given a full physical machine just for yourself - might be usefull for special dedicated hardware needs. It is almost identical to a dedicated resources VPS.

Cloud Hosting same as the others but the virtual os is run on multiple physical machines instead on a single one. Has the advange that are highly scallable.

SQL cloud vs VPS SQL
SQL cloud - you dont have to install and update your DB but it is more expensive

You can have one FREE non-preemptible e2-micro VM instance in US
2 vCPU, 1 GB Ram, 30GB storage 2.000.000 inodes
https://console.cloud.google.com/compute/instancesAdd

CDNs - Content Delivery Networks
Cloudflare.com - offers FREE basic CDN
- free DNS server with instant propagation
- free SSL/TSL CA certificate
- CDN - cache servers - saves BANDWITH and offers faster response time

It is a distributed network of servers that are situated physically all over the world that cache your content from an origin location where your website is hosted.
The closer the server delivering the files is to the end user the faster the loading will be.
It is especially useful when you serve a lot if static resources like images.

Namecheap.com - register domains

 
Tools

Uptime – uptime monitor your hosting servers – Uptime Robot
Free VPN – to check how the site behaves from different locations – Tunnel bear
Load impact testing – test and know your hosting server limits – k6
Wayback Machine – useful for checking old domains or even for restoring your website in case of an emergency – https://archive.org/web/

Saturday, August 27, 2022

ffmpeg - fast audio video edit

 Cut video segment

 Download the ffmpeg.exe and run it from cmd. https://ffmpeg.org/

ffmpeg.exe -ss 00:12:58 -t 00:04:29 -i video.mp4 -acodec copy -vcodec copy segment.mp4

-ss -> set first time interval
-t -> how much to cut in hours minutes seconds
* note this is not the second time position in the original video but it is t2-t1 - where t1 is the time mentioned with -ss
-i -> the input video

For exemaple original video has 20 minutes and we want to cut a segment from time 00:12:58 to time 00:17:39. si 17:39-12:58 = 04:29 -> 4 minutes and 29 seconds.

 next two to copy both video and sound 
and last argument segment.mp4 the name of the output video.

Cut a song from a video and then convert to mp3. 

ffmpeg -i song2.mp4 -vn song2.mp3

-vn option explicitly drops video so the conversion is much much faster.

Repeat song / video

ffmpeg -stream_loop 3 -i input.mp4 -c copy output.mp4

Extract audio mp3

ffmpeg -i input.mp4 out.mp3

ffmpeg -i input.mp4 -vn -acodec copy out.aac/mp3 - check with mediainfo

ffmpeg -i out.aac out.mp3


Sample rate = 1 sec = 44.000 samples

44khz -> 2 chanells of 22 khz each 

human hearing 20hz - 20khz

CD 44khz. DVD 48khz HD 96khz

Subtitles

ffmpeg -i "in.mp4" -lavfi "subtitles=sub.srt:force_style='Alignment=2,OutlineColour=&H100000000,Outline=1,Shadow=0,Fontsize=18,MarginV=70'" "output.mp4"


Saturday, August 13, 2022

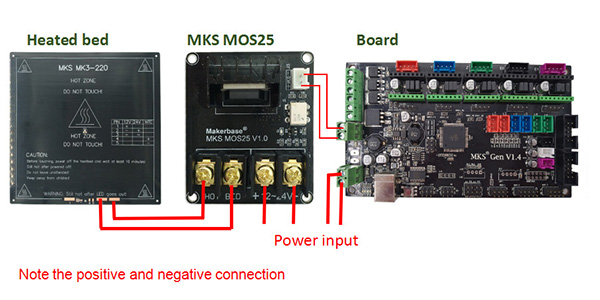
Heatbed MOSFET 3d printer

  HA210N06 -  210A 60V N-Channel MOSFET - datasheet

MB6S - Bridge Rectifier - it corrects reverse polarity to MOSFET gate - so you don't burn it. With this on the board you can connect the wire without worrying about polarity. - datasheet

EL 817 C915 - PHOTOCOUPLER - datasheet

The way it should be used it is like this:

MOSFET 25A

Voltage limits of the circuit

On the drive signal - the limiting factor is the optocoupler max forward current of 60ma. We have a 10k resistor so a maximum of 600v - that also coresponds to the bridge rectifier max voltage. So we have no maximum real limit but we have a problem with the minimum voltage.

The optocoupler support maximum 35v on the output side collector-emitter. The MOSFET takes 25v on the gate-source side, and it has a voltage divider of 50% so it takes a max of 50v DC IN but we have the 35v limit on the optocoupler. So 35v is maximum DC IN.

optocoupler input is connected through a 103 resistor - 10k - after it passes through the bridge rectifier first. If you are using a microcontroller with 3.3v logic voltage it will not open. You need to replace the 10k with 1k 102 resistor.


Tuesday, May 3, 2022

Wordpress move errors and fixes

Export wordpress blog from one domain to another


1. To move a wordpress installation just go and archive the files where wordpress is installed and make it a zip archive as cpanel can extract only zip files.

2. Open phpMyAdmin and export the database to export_file.sql
You are done on the old server.

Login to cpanel on new server.
Go to File Manager upload and extract archive to public_folder.

Create a new database and a username and associate the username to the database.
Open phpMyAdmin select the created database and import the export_file.sql


Next we have to change Site URL and Home Settings to point to the new domain.
Select wp_options table and edit first two rows : siteurl and home to the new domain name.

Optional you can add to wp-config.php the lines instead of edition the wp_options table, but this will grey out the url option in wordpress admin so i suggest to use the database table edit.
define('WP_HOME','http://example.com');
define('WP_SITEURL','http://example.com');

Next edit wp-config.php and insert database name, username and password of the user associated to the database :

/** The name of the database for WordPress */
define('DB_NAME', 'database_name');

/** MySQL database username */
define('DB_USER', 'username');

/** MySQL database password */
define('DB_PASSWORD', '1234');

WP - Error establishing a database connection

Yousite.com/wp-admin/maint/repair.php


Press the Repair Database button:
The wp_options table is not okay. It is reporting the following error: Table is marked as crashed and last repair failed. WordPress will attempt to repair this table…

For this to work you must have this enabled:

 wp-config.php 

define('WP_ALLOW_REPAIR', true);

Also check in here that the corect database is selected, and you can also check with phpMyAdmin the database.

Fo security reasons you should disable it afterwards.

It can be done in multiple ways.

First is edit php.ini. Find error_reporting = E_ALL and add to it to look like this :
error_reporting = E_ALL & ~E_NOTICE & ~E_DEPRECATED

then restart apache server.

If this does not work you can always go to your wordpress installation and edit wp-config.php and add this :

ini_set('log_errors','On');
ini_set('display_errors','Off');
ini_set('error_reporting', E_ALL );
define('WP_DEBUG', false);
define('WP_DEBUG_LOG', true);
define('WP_DEBUG_DISPLAY', false);


instead of  :
define('WP_DEBUG', false);

Refresh the page where you got the warnings and enjoy. ;)


Thursday, March 3, 2022

Linux Python

 To install a custom version of python, download and compile from here:

https://www.python.org/ftp/python/

MuEditor - requires python < 3.9 + install libsqlite3-dev before compiling 

python3.8 -m venv mu-editor              (create a virtual env in the mu-editor folder)
cd mu-edit/bin
source activate                                       (activates in console the virtual env)

pip install mu-editor


To install python apps you use pip

Pip aplications: https://pypi.org/project/mu-editor/

Make shorutcuts for python apps while in virtual env

pip install shortcut
shortcut mu-editor

Friday, February 11, 2022

Take a screenshot of an entire web page from chrome

 Open inspector mode - F12 or CTRL+SHIFT+I

then CTRL+SHIFT+P

and type screenshot - and select Capture ful size screenshot.


Friday, January 28, 2022

Video - vlc crash, reduce video size, resolutions, davinci on linux

Vlc crashes when taking a screenshot

I tried to take a screenshot from a .mkv video and it crashes every time though it works fine with normal mp4.

To fix it disable hardware acceleration in codecs.

Go to Preferences - Input/Codecs - Hardware-accelerated decoding - 

Change from Automatic to Disabled.

Try again. It worked for me.

How To Reduce a Video File Size

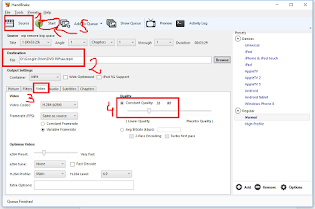
Download Handbrake : https://handbrake.fr/downloads.php

Install handbrake then follow the image instructions :

1. Select Source and put you video in or just drag the video over handbrake window.
2. Select Destination and type and name for the video.
3. Select the Video tab and drag Quality to the left up to 25 or even lower dont go lower then 30 as it gets bad, but you can test and see what you like.
4. Pres Start.

Resolutions compatible with full hd or 1920 x 1080

HD     720p   -- 1.77:1 (16:9)  /  1280x720
FHD 1080p -- 1.77:1 (16:9)  /  1920x1080
QHD                                        2560x1440
UHD 4k       -- 1.77:1 (16:9)  /  3840x2160

At under 100 ppi image gets pixalated from close up 20-30cm
For a PPI ~100
4k 3840x MAX 42 inch
QHD -  MAX 27 inch
FHD MAX 22 inch 

Run Davinci on Linux

Once you install DaVinci you  get a message that no suported video cards are detected and something about no media storage.
You need to install video and opencl drivers.


Wednesday, January 12, 2022

Install scanner in linux - Brother DCP-7030

Scanner in LINUX - SANE - Scanner Access Now Easy


sudo sane-find-scanner  *** list connected scanners
lsubs *** view usb connected devices ( sudo apt install usbutils )

scanimage -L  *** check if sane detects your scanner
SANE_DEBUG_DLL=3 scanimage -L
load: dlopen() failed (libusb-0.1.so.4: cannot open shared object file: No such file or directory)

To fix it:
apt search --names-only libusb-0.1
rezult: libusb-0.1-4/stable 2:0.1.12-32 amd64 
sudo apt install libusb-0.1-4 

Open the file -> /etc/sane.d/dll.conf 
and add one line with 
brother3
!!! note when you run scanimage -L it will check every record, so just delete all records and leave your printer name

Create a new file with your printer name and add it.
brother.conf
firmware /usr/lib64/sane/libsane-brother3.so.1.0.7
usb 0x04f9 0x01ea

!!! you get vendor id from lsusb or sane-find-scanner

You might just use the install package to install the rules file automaticly instead.
/etc/udev/rules.d/60-myprinter.rules
# Brother scanner
ATTRS{idVendor}=="04f9", MODE="0666", GROUP="scanner", ENV{libsane_matched}="yes"
!!! change idVendor - with your printer vendor id

Brother DCP-7030
udev rules -> brother-udev-rule-type1-1.0.2-0.all.deb
driver -> brscan3-0.2.13-1.amd64.deb

reboot
Things I did that i don't think are necesary:
sudo usermod -a -G myuser scanner
Copy the driver files under /usr/lib64/ to /usr/lib/.

For printing
Install cups, and brlaser (driver)
then go to localhost:631 - adminstration - add printer - done